Monday 17 June 2013

Dan Dare: Pilot of the Future - Haynes Casts an Eagle Eye


A product of the 1950's, Dan Dare brought science fiction to a young generation looking for escapism in the post-war years.

Introducing a range of characters, enemies and beautifully conceived spacecraft through the Eagle comic the world of the near future looked bright and exciting.

Seeing as we're now on the other side of the period in which Dan Dare: Pilot of the Future was set, I can confirm that it's definitely fictional and at no time have I seen or heard of the Mekon existing nor have I recently been to the Marsport Museum. That won't stop fans from lapping up this new volume in the Haynes library: Dan Dare: Space Fleet Operations Manual.

With two feet firmly in the fictional universe aside from the introduction, this might not necessarily appeal to a massive science fiction audience it will attract readers of a certain age and those with an interest in comic history at the very least.

Now I'm not in any way saying this is a terrible book and should be avoided like the Crimson Death, but it is an acquired taste and very, very Anglo-centric. The characters we meet here are the very pinnacle of what it meant to be British in the 1950's and they are in turn accompanied and supported with a myriad of alien creatures well imagined by the writers over 60 years ago. The artwork is recreated in pristine fashion and you can see the influences of the period right the way through. The most evident is in the style and design of the ships that this manual covers so well.

Being almost a complete virgin to the world of Dan Dare I was worried I would be completely at sea and find this very difficult to get into. That wasn't the case as Rod Barzillay provides a great route into the universe through a detailed narrative section which tells the backstory of the first space missions, Moon and Mars landings as well as the science behind the ways in which these adventurers made their way to the stars. This more than adequately sets the scene for the world in which Dare exists and before you know it the page turns and you're confronted with the craft of the time. The shapes, colours and features of the Venture or Neptune Class ships are heavily indicative of the 1950's - lots of windows, bright colours, fins, wings and big rockets that would have mirrored the cinematic serials that were popular on both sides of the Atlantic and created more amazing worlds for the children of the time.

The illustrations from Graham Bleathman are new for this volume and explore every nook and cranny of the vast range of ships that were stars of the comic and inspired a generation. I did appreciate that these were also backed up with original snippets from the comics to show the action of the series and give you a visual point of reference. The fact that a lot of the cutaway drawings have over 50 points of interest keyed to them says a lot about how these were visualised at the time. 

Just in case (like me) you have zero idea where each of the ships such as the Anastasia or the Marco Polo were featured then each vessel or space station or base is introduced with a small piece detailing its purpose and also an "ISF Data File" that explains where it was featured within the Dan Dare adventures. Instead of leaping out of context and relating these to the publications they are kept within the fictional universe. Only at the end of the book is there a section compiling where key incidents can be found in the comic and annuals produced.

The Space Fleet Operations Manual does cover a great deal in relation to the fleet craft as well as those of their allies, enemies and civilian craft that graced the pages of Eagle. One thing I did find a bit lacking was the personnel files especially when it came to Dare and the Mekon. Each are only given a few lines amidst the multitude of characters who were part of the stories and I would have appreciated a bit more space being given to the more key figures so I could get to know their significance and important moments. In regards to the cast, there were a lot and I did have to go back over them a few times to get their relationships and who did what, who was killed where and how that person was relevant to this situation. Some sort of diagram might've helped at this point but I think I got there in the end! 

Also, a note to Haynes that while the books are brilliantly produced and bound in glossy hard cover, some of the items keyed are lost in the centre of the book. Case in point here would be Tharl's Battleship which graces the back cover as well. The outer ring of this ship is a big part of its design but because of the way the pages are bound the centre hits right across this part of the ship and detracts from the experience. A real shame as I was massively impressed by how much detail is included on each of the pages. As you can see from the illustration here each page is well laid out and balanced to give a full overview of the vessel - some in colour, some black and white. On occasion some of the lesser craft (and creatures) are condensed into sections such as those covering Threen or Theron craft later in the manual. Some might think that this could be a negative however keeping themanual focused on the more prominent ships az well as paying minor dues to also seens ensures that the whole of the Dsn Dare story is covered. Notably it is smaller ships that are picutured and not cutaway so I dont think there is much being missed.

It's definitely a book for those of a certain taste and perhaps a certain age who remember Dan Dare: Pilot of the Future from their youth and days spent reading his battles with the Mekon and other alien races. For sci-fi enthusiasts it will provide a great chance to see how writers and illustrators believed things might turn out in the near future. It's strange to think that this was how the 1950's throught the 1970's through to the present would turn out. According to Dan Dare we should have colonised the Moon, Mars and one or two asteroids as well as being able to travel to the edge of the solar system all through an alliance of the UK, USA and France - what happened there?! The optimism is almost as overwhelming as the now retro illustrations. In comparison the cutaways do retain a crispness that marks them out as new but their external colouring has managed to be planted firmly back in the creative world of the 1950's.  

As a segment of history on another hand it's absolutely priceless. A way to view the attitude of the post-war generation, their optimism, their search for a hero and their desire to literally reach for the stars. For those with a passing interest it might be a bit of an overload unless you are considering reading the adventures of Dan Dare yourself in the near future. Existing and long time fans will not be disappointed as there is nothing to bring dislike here and the manual will add one more level of technical reference to your Space Fleet library. The hopes of an age burst from opulence and magnificence of the grandiose space concepts on each page and beam from the faces of the heroes sent out into the great vacuum to save the Earth and explore the solar system. 

This might have been a creation of my father's time as a boy but it was entertaining nonetheless  It makes you realise how easy current youngsters have it - do they have such strong, moral, law abiding role models to aspire and look up to? Maybe this is an avenue to showing the kids or grand-kids that there's more to life than waiting for the launch of the PS4, X Box 1 or the next big computer game - open a book, start with this one.

Dan Dare: Pilot of the Future: Space Fleet Operations Manual is available now from Haynes Publishing priced £16.99 ISBN 9780857332868

Wednesday 12 June 2013

McLaren M23 Owners' Workshop Manual - Haynes Goes F1


Back in the 1970's there were two great Formula One cars;  the Lotus 72 and following it, this - the McLaren M23.

The release of this Haynes Owners Workshop Manual might initially seem a bit strange however it all makes sense when you appreciate that this year will see the arrival in cinemas of Ron Howard's Rush! which tells the story of the epic battle for the 1976 World Drivers' Championship between Niki Lauda and James Hunt.

http://companhiahistoria.blogspot.co.uk
Of the Haynes Manuals I've attacked in the last few months this is certainly the most technical and, strangely, the first one that deals with a real world, physical object.


The McLaren M23 brought the now Woking-based Formula One team two world drivers’ championships in 1974 and 1976 at the hands of Emerson Fittipaldi and James Hunt respectively but far from being a book that focuses solely on these two events, Haynes have produced a book which examines every aspect of the car from its design, through its racing career and to where the various chassis’ are today.

A Formula One fan but not being overly technical there were some aspects here that totally overwhelmed me within this Owners’ Workshop Manual especially when it came to discussing brakes, construction and the minutiae of the Cosworth engine which powered the car. Fortunately that section is not a huge chunk of the book and the remainder, for someone more interested in the historical detail of the sport and the McLaren team, is a snapshot of one period in the team’s history as it began to grow into one of the biggest and most renowned teams in the global sport.

Memorabilia is plentiful as well throughout whether it’s racing notes, paddock passes, sections of bodywork or James Hunt’s steering wheel from Japan ’76, you’ll find it in here and kudos to Haynes for making sure that all the people behind the scenes and the bits they’ve collected are given just as much page space as the men who drove them to multiple wins and championships. No longer are they the unsung heroes of F1 as the M23 Manual puts them firmly in the picture in whatever role they acted.

Courtesy of Haynes
The opening section – as the book is separated into seven distinct segments book-ended by Introduction, Epilogue, appendices and indices – covers the story of the company under the guidance of both Bruce McLaren and later Ron Dennis before turning attention to the M23 project. Documenting the classic F1 car from drawing board with insights from those involved, the story illustrates to how its success paved the way for a series of world champions to pass through the doors of McLaren from the 1970’s right up to the present day and 2008 winner Lewis Hamilton.

. What the book makes very apparent is the longevity of the M23 and the 14 chassis that were produced in the 1970’s. Indeed, it’s story is stuff of legend not only for the fact of the 1976 season but also as it provided the first F1 drives for both Gilles Villeneuve and Nelson Piquet later in its competitive life.  Not only that but we get to understand how and why there were three M23s racing on the grid at one time due to deals with major sponsors Marlboro and Yardley. In every way Haynes have covered all angles of the story, not just examining the more intricate mechanical details that they may be better known for in the past on these “real world” vehicles.

Today a car might last a season or at the most a season and a few races at the beginning of the following championship but here was a car that lasted through at least four campaigns and some of its number were raced abroad after that, even fairly recently. The hundreds of people who can be seen around the pits today is a huge leap from the 20 or 30 individuals who made up the entire team when the M23 took to the track in anger. CADCAM and many other design, building and testing processes were probably not even a thought of a possibility and here we see how the team knew all aspects of their car inside and out.

Indeed, its 40 years since this car was racing but the level of information recalled and documented here is impressive. For those technically minded the breakdown of the car and its workings is a real eye-opener and I would suspect that this would be a wonderful reading companion against Haynes other F1 based publications the contemporary Lotus 72 and the recent championship winner the Red Bull RB7.  What the latter of those books would certainly not provide you with is such an amazing history lesson of this era and the life stories of the cars especially after they had competed in Formula One. For me this was the highlight of the production as we are led through each of the chassis’ lifetime and where they are now. Incredibly only M23/7 does not survive as it was used for training at Brands Hatch but all the others are still around and in use in some form or another. Accompanying them and the rest of the book are a wealth of pictures covering the entire history of the car, the places variants ended up in and the bizarre guises some chassis’ took on over the year, most notably the Can-Am bodykit fitted to M23/2 for racing abroad.

automotobounce.com
In fact the anecdotes from former drivers such as Jody Sheckter, Jochen Mass and Emerson Fittipaldi really lift this book as do the contributions from engineers who worked on the permutations of this classic F1 car. The real loss here is that due to his sudden death while in his 40’s we miss the chance to hear James Hunt’s thoughts on the car that took him to championship glory in a wet Japan.  The ownership story of the car doesn’t stop there though as Haynes have researched and spoken to collectors as well as privateers who restored, showed and raced them over the years following. To use a bit of a cliché there really is no wheelbearing left unscrewed. In fact that’s another key area with this book. Not only does it detail the afterlives of the cars but how they are looked after, what they do now and how they are restored to their original condition.

www.diariomotorsport.com.br
Their insights into driving and maintaining the M23 then and now mean you get a feel of how special and unique this car was. Even in its later F1 career it took on and beat the Ferrari 312T2 of Niki Lauda (circumstances mitigating) for the 1976 championship.  Probably more so than Fittipaldi’s championship in 1974 the car is remembered for that legendary year even though it was probably not the best car in the field having been around for some time.

Diagrammatically this is not a book that you will be pouring over if you like a cutaway diagram or a keyed picture as they are very few and far between; the illustration on the cover itself marking the only dissected picture in the whole volume. This doesn’t in any way detract from the superb content but might leave those people who collect the more unusual manuals a little wanting in its illustrative areas. In all honesty this feels like a real nitpick as the M23 Owners’ Workshop Manual is a labour of love and by getting fully ingrained with the car you get the real sense of how important it was for not only the people who built it, drove it and have cared for them since but to McLaren, F1 and motorsport history. In fact so much so that I would now happily go and find a copy of Haynes’ Lotus 72 book and demolish that in a couple of days.

autoweek.com
The relevance of the book today is of course is that Ron Howard’s Rush! is about to hit cinemas and here there is a section dedicated to the production as well as photos from the set of the movie which was shot with original cars as well as replicas and the involvement of people who were part of the M23 story during that 1976 season.  Some of these photos may not be available anywhere else so it’s almost as if we’re getting a bit of a sneak preview and comparing the replicas to the originals you would really be pushed to find any way of telling them apart on the surface. As a teaser to this motion picture this just gives enough while keeping it in the context of the events featured here.


autoweek.com
This would make a wonderful addition to any F1 fan’s library. Older fans would maybe take this as a sweet nite of nostalgia while newer fans might revel in the dangers and anecdotes of the sport that are plentiful throughout the pages here. While the M23 is held in high esteem it was still a very, very dangerous era in which to race as some of the recollections within the book will testify. If nothing it does reinfoirce how safety has come on in 40 years as well as the technology involved in creating and maintaining these cars.  A brilliant, if occasionally wordy book from Haynes that I’m glad I got the chance to read. I have a much better understanding of not only the era in which the M23 raced but the fabric of the team and how Formula One used to be. A truly golden era for the sport.

The McLaren M23 Owners' Workshop Manual is now available from Haynes priced £21.99 ISBN 9780857333124

Saturday 1 June 2013

Haynes Millennium Falcon Owners' Workshop Manual

With a total understanding of how to fly Thunderbird 2, maintain a Klingon Bird of Prey, differentiate between incarnations of the USS Enterprise, it seemed only right to look at one of Haynes' classic sci-fi manuals. 

At the end of the year Haynes will be releasing their Death Star manual but there has already been one Star Wars manual on the iconic Millennium Falcon. In true style I have already bought the t-shirt, watched the movies and built the Lego model so reading and reviewing this seemed like the logical final chapter.

Focusing on the history and features of the Millennium Falcon from its original building by the Corellian Engineering Corporation (CEC) to its involvement in the final battle of the rebellion seen in Return of the Jedi it is probably the most detailed fictional volume in the range.

I'm not saying that this lessens the quality or impact of the Star Trek or Thunderbirds volumes but that this is a book packed to the spine and page edges with information and detail like no other. Now I'm not a hard-core star Wars fan so a lot of the detail here is new to myself outside of the three classic trilogy films. Luckily Ryder Windham, Chris Reiff and Chris Trevas have provided a detailed introduction to both CEC and the YT-series even to later models which followed the YT-1300. I didn't appreciate a lot about the design and evolution of the series but this effectively filled in a massive gap in my knowledge of the subject. What becomes very quickly evident is how much beyond those three films there is JUST in regards to this one ship which in itself is one part of one segment of the story. 

While I knew it was an old ship this manual opens up its immense backstory as well as highlighting previous owners and the range of improvements that were made through its long active service life. It was certainly eventful and through the inclusion of all the stories here you can see how the Star Wars universe takes on board all the additions that various authors have added since the 1970's.  There's even a footnote at the end indicating that there's much more to the story of the Corellian freighter following the destruction of the second Death Star over Endor.


Once we've understood this extensive timeline as well as how Han Solo, Chewbacca and Lando Calrissian fit into the story, we're into the detail and the technicalities of the ship. From piloting the freighter we're taken through a journey which covers every aspect of the operation of the Millennium Falcon with each area split into distinctive sections; Propulsion, Weapons & Defensive Systems, Engineering Systems, Sensors and Crew Facilities topped off with a handy comparison chart of the ship against both Rebel and Imperial vessels from the period of the Episodes IV to VI. What gets me is how much is crammed in. Not only is there informative text which relates each section to the incidents that we would know from the movies but also to the history of the Falcon and then to the keyed illustrations which are plentiful throughout. Some are cutaways such as the one above which is also featured on the cover of the Workshop Manual while others deal specifically with a piece of technology or a control console within the cockpit. As with the Klingon Bird of Prey, each system is broken down into components and then its function and the way in which it works explained as completely as possible.

To the casual fan such as myself it's a treasure trove of information about the Millennium Falcon that marks it as an absolutely essential purchase because of just how much has been built into its history and operation. Everything has a purpose within the story and for me one of the highlights was the historical section on the YT variants produced by CEC as well as how the YT-1300 modules meant that it was a ship that could be custom fitted. Indeed, a lot of custom-fitting took place under her future owners and it's these little additions that make the book ever so real; the throwaway lines, the aside comments and the keyed items that might seem insignificant or have never been used, but have been thought about and included when detailing the freighter. Nicely each of the sections regarding the functions aboard is opened with text "taken directly" from CEC marketing catalogues and technical manuals, communiques or books of the Imperial Fleet. This of course adds impact to the universe that the ship and her long chain of crew exist within but like previous editions of the Haynes "fictional" manuals (particularly the Klingon Bird of Prey) it balances on a point and doesn't clearly sit on one side or another. It's a fine line and I actually think a difficult one to walk if you want to be encompassing to fans of all knowledge levels and passion. To compare, the Enterprise manual was very much set from the present day and fictional universe perspective which forgave the stills used because it knew it was an informative book rather than historical and technical as here.

For example, while there are superb, detailed drawings of the ship and her features, they are accompanied by pictures from the films so it never truly sits within the fictional world of George Lucas or the "real" universe of the saga. The images in some respects play against the text and diagrams and certainly for more hard-core Star Wars fans this might be a distraction. For more casual readers it does however help put things into perspective and allow you to refer to where these items are seen within the movies - there's a lot to look out for on your next viewing I can assure you!


For those of you who are die hard fans - you probably already own this and if not, you more than likely have an encyclopedic knowledge of the subject however for the detailed drawings and keyed diagrams of the interiors of the ship, her systems and features, I would still recommend this manual.  It is nothing if comprehensive and will look very nice on your shelf alongside the Death Star Manual when it gets released.

My only real niggle with the Millennium Falcon manual is that the techie stuff can get quite heavy after a while.  One hundred and twenty-three pages might not sound a lot but when you're trying to understand the ins and outs of the hyperdrive it can get a bit hard going. To help out though, the illustrations are a big benefit and relating components to events that have happened through the ship's lifetime mean there is something for you to visualise and comprehend how the ship has evolved - it's certainly not box fresh by any standard. Getting to know what caused alterations and how the Millennium Falcon has changed under various owners really brings it to life. The book does help answer some questions about the ship and did for me personally - I now understand why she's the shape she is within the Star Wars universe (aside from the fact that the film designers made her look that way), what the dish on the top is for, what the two "prongs" at the front do and where all the sets we see within the trilogy exist within the hull. While on larger vessels this might be a problem, the small size of the Falcon allows this book to cover just about every aspect and every corner. 


While I've mentioned already the area that still leaves me a bit undecided with the use of film pictures versus diagrams and narrative as though "really" in the Star Wars universe, there were a lot of highlights and I certainly feel enlightened and a more aware of the amount of detail and attention paid to the franchise. One of those little gems is the history of the Millennium Falcon and the picture on page 30 of the vessel under the name of Staellar Convoy, docking on Coruscant. This was a much talked about shot during Revenge of the Sith and its inclusion is a nice pay-off especially for those of us who failed to spot it even though we were told the freighter made a blink-and-miss guest appearance. Clearly there is a big picture and a single story that is adhered to; each piece has its own story and somehow it all links back together. A great read for fans of all understandings from Youngling learner right through to Galactic Emperor. Not only that, but a good warm-up read ahead of the imminent Haynes Death Star release....

The Millennium Falcon Owners' Workshop Manual is available from Haynes priced £14.99. ISBN 9780857330963

Images contained above courtesy of Haynes


Wednesday 20 February 2013

Operation: Shed - A Serious Outdoor DIY Project

I fear that my blogs are starting in similar ways but there's no way to avoid what will become blatantly obvious - I am not a born DIY-er. I can build it, I can fix it but I will need to take my time and think things over.

I also realised that The Review could easily slip into "I read this..." territory but this should rectify that issue for I have built my first shed. Just to get you into the mood as I review the journey and the product itself, here's how it all began...


All looking good huh? Yep, that's what I thought. This is a Economy Overlap Apex 4' x 6' BillyOh shed consisting of 
Eeze-base instructions
  • two roof panels 
  • two back panels
  • one side including two slots for plastic windows
  • one blank side wall
  • one door
  • two panels for either side of the door
  • two roof gables
  • "modesty" wood strips
  • door hinges, nails and screws
I would also recommend you have the following to hand (or at least know where they are) before starting:
Day 1: Unpainted
  • club hammer
  • hammer
  • power drill - charge it!
  • screwdriver
  • wood saw
  • shed paint
  • step ladder
  • hacksaw
  • sharp craft knife or scissors
We also invested in an Eeze-base to stand the shed on due to the somewhat uneven nature of our garden. Now according to this YouTube video and as I have already stated, this should take four hours, start to finish. Let me tell you that this is absolute and total codswallop. Good video though and does give you some idea of what you're going to be doing if you've never built a shed before - so perfect for me.

Day 1: Four hours work
The ground where the base was to stand was uneven and needed clearing of crazy-paved concrete slabs. Once they were removed then it was a case of levelling the ground. Now, before you do anything else, lay out the Ezee-base (if required) and make sure that it will fit. With ours the basic frame was too big for the shed and The five horizontal beams had to have about a foot of wood chopped off otherwise the entire shed would have been resting on them. Once laid out, we marked out equal points on the vertical beams and then laid the supports in at these locations - three internal and two at the ends. They need to be double-screwed at either end with 100mm screws. There are four metal "L" shaped supports to help settle the base level and these were of good use here and you will need two of you to ensure that the base is level as you screw them into place with 45mm screws.

Paint first; build second
Next screw into place the four corner spikes and, using the club hammer, secure the base into the ground. Now this all seems pretty straight forward but it's the laying out, marking and cutting that takes the time here. If it was all pre-cut and on a bowling green it would probably be all done in an hour or so. Just beware that a lot of this is taking DIY in the literal sense.

At the same time as you're laying out and setting the base it's worth having your helper (in my case Daniel) painting up all the shed panels in preparation for construction. We chose to use Wilkinson's Timbercare dark oak which is why it's a different colour at the beginning and end! Also if you are painting it there's no way this will take four hours. Indeed, in the video referenced above they don't even show the shed some paint and dependent on weather conditions it can take between two and four hours to dry. Now for us at this point the light faded and our first day's work was cut short ready for Sunday and some proper man-sized construction work.

The "generic" instructions
Sunday came and, lo, it did rain. It rained all day which is not the best when you have a lot of unbuilt shed sitting in your garden. Getting the floor down was the first move. Our Eeze-base was slightly larger than the floor but I'm happy with that and am happier that it was larger than being smaller! Now I have a massive issue at this point. The instructions you get with the 4' x 6' shed are very, very generic and you need to have a bit of nous about you to ensure that it goes together correctly. They seem to be for a 6' x 6' or even a 12' x 8' given the inclusion of four windows and a double door. Great that they cover all possibilities but when you're dealing with the baby of the range it's not a great help.

Day 2: Fixing panels
Having all the panels painted by this point pays off because all the hard to reach points are covered as you become aware when placing the first rear and side panels into place. I would recommend that this isn't the side with the window so you get a strong section to work from. Having everything laid out ready is also recommended as you can easily select the next piece without too much hassle even if the instructions are, frankly, rubbish. In fact the next rear, window side and two door support panels went together very easily. Make sure you're drilling pilot holes for 45mm screws and don't be too worried about losing one or two as there are plenty in the bag. Now at this point it's feeling like it's about six degrees below zero and all feeling below the neck is rapidly fading but with the rain still coming down getting the roof on was becoming something of a necessity. I must also apologise for this picture mid-construction. I only wear tracksuit bottoms for such tasks as heavy-duty gardening and decorating. They are not a clothing item of choice.

Ok, the evening was drawing in as we lined up the two roof gables. One is clearly for the door so don't get them mixed up at this point in the build or you'll be in for some fun later on. They should go on pretty easily and then comes the interesting part and you will need two people. Each of the roof panels needs to be aligned with the gables and you will need someone to hold it as each one is nailed into place. Oh - did I mention it was also raining at this point?

Day 2: Felt roof next
Once in place you'll need to cut the roof felt to size. If you've never used it before, this stuff is both gritty and will rip in an instant so be careful how you handle it. I would have waited for better light as our was fading fast but due to the weather conditions it needed to go on asap. Looking back it would probably have been wiser to measure and cut the felt BEFORE putting the panels on the roof but there's the benefit of hindsight and sense. Again two people are necessary for holding and tacking the felt into place - one for each panel and then a third piece to close any gaps across the top. At this point we called it a day - it was dark and neither myself nor Daniel could hold anything metal due to the temperature!

Day 3: Starting point
Now it would take a week and a slight snow shower before we could get back out to the shed although at this point it was more like a wooden lean-to with no windows or a door attached (above right). Getting out to finish it on a sunnier, warmer Saturday morning was great. First job was a bit of touch-up painting and then trimming down the felt and attaching the edging boards. This was done and dusted quite quickly in comparison to the previous weekend's activities. Be gentle with the boards because a bit too much hammering can crack them - and the same goes for the finials at the roof top. I had to glue one of the latter back together after a fairly rough knock with the hammer.As you will note from the picture to the left, this was our starting point on Day Three. There was quite a bit of felt to cut away and some minor painting to finish due to the previous weekend's weather. I'd also point out that even at this stage the shed was not fixed to the base - I wanted to make sure the door would fit before we attempted setting it firmly in place on the base forever more. Also it meant that there could be some painting touch-ups at the back where necessary.

Day 3:Union tea break
Using the batons for guidance, the door hinges attached with 30mm screws and it was straight onto the frame with no concerns. The only thing I did notice was that there was a slight gap down the opening edge of the door but I'll cover how that was resolved in a bit. I also added both the swivel catches to the main frame of the shed to ensure the door closed fully, again with 30mm screws. Next on were the two window panels. The last time I assisted in shed-building with my dad in the early 1990's I remember these being glass so I was more than happy to find the ones supplied with the BillyOh shed were plastic.They, as with most of the shed, fitted very easily and were held in place by three strips of wood nailed to the frame. This made me realise that you need to be careful where the screws holding the panels together are placed back at the initial construction stage as it could affect how you fix in the plastic windows. I would say this was one of the few stages where I referred to the instructions - also helpful when working out why there are several long strips of "modesty" wood and how they should go to cover up corners and panel joins around the structure. At this point you can screw the whole structure down to the base with 45mm screws. There are more than enough in the pack so don't worry about how many you use. From personal experience I would say one at either end of each panel is a minimum and then possibly 2 more central if you're concerned it might be flimsy. I chose to do the latter however it was pretty rigid before I did.

One thing that the instructions don't account for is the padlock. I would say it's worth having some spare wood to hand because however you attach the fixing the screws will go through the door and frame. Having that extra few bits of wood will suffice to give the screws something to drill into. The gap down the side of the door was easily covered by placing some extra strips of "modesty" wood into the gap, gluing and screwing them together. The end result, while a little "A-Team" was more than enough to solve the issue. Also the padlock itself doesn't come with any screws if you order it with the shed. However, saying all this is great but how about we take a look and see it in glorious HD...


Thanks for that opinion and tour of the shed, Clive. Much appreciated. The overall result (as you have now seen) is much better than I expected and does the job it was intended for. The instructions are little better than guidance in a very general sense so don't take them as gospel at any point as common  sense is probably more reliable and accurate. It's a good structure and for the price and size it's thoroughly worth it and has solved some storage problems. For someone who has never built something like this before it was very easy to work out but you do need two people for some of the lifting and adjusting. I found that keeping it off the base until the last possible moment meant I could check everything at the back of the shed was in place and right as there is very little gap between it and our existing outhouse. To any of you thinking of having a go, this is the perfect way to start - and make sure you paint it first though as otherwise you might end up with fiddly gaps exposed!  I've not been disappointed and look forward to my next DIY challenge. 


Day 3: Operation Complete
Thanks also to Daniel for helping out for the weekend through rain, wind and freezing temperatures. Your help was appreciated all the way! Thanks also to my partner, Melissa for supplying sandwiches and tea throughout the experience - and ensuring the heating was on!


Sunday 10 February 2013

Lego Star Wars: Building the Falcon

As you will come to appreciate from either this blog, The Commentary... or Some Kind of Star Trek, I'm a bit of a big kid when it comes to anything sci-fi/geek related.

I'm almost thinking that this review could do with an Alcoholics Anonymous introduction but in reality it's not something I'm going to be weened off anytime soon and that's why I've chosen to talk about the latest - and long overdue - addition to my Lego Star Wars collection which has been steadily growing since the late 1990's. To help you get a better feel for the model I've included some larger than usual photos to save you squinting!

First of all, let's have a short interlude:


This is purely to give you an idea of the scale of this Lego monster. How well did I open and close the roof segments? Oscar performance, no doubt yet it does give a good impression of how easy it is to get into and close up the outer hull. Just watch the central back and central front panels go down in the right order!

Ok, serious now; I've waited a long time to get my hands on the Millennium Falcon and this is the third version that Lego have released since 2000. The first was based on A New Hope (7190) and had a single plastic removable lid (urgh). The second version, this time updated to The Empire Strikes Back (4504) placed the legendary ship on Hoth with a special Han Solo snow figure and Snowtroopers to boot. The lid was in segments and the interior nicely detailed - even the entry ramp could be lowered through a quirky little pull and push mechanism in one of the side ports. A good friend of mine had this one and it was a smart chunk of kit especially due to the link in with Episode V. Oh yes - there's the massive 3000+ piece Collector's Edition ship as well but as that's not in what I would class as the "affordable" range I'm omitting it from this discussion.


Box art for set 7965
What we're looking at here is Version 3.0; a new A New Hope edition (apologies - bit of a mouthful there) featuring the Clone Wars packaging from the 2011/2012 range. At best guess it took about four to five hours to complete with 100 steps over two booklets of around 160 pages taking you from brick to end result. The only thing I would say here is that the instructions could do with noting how many "Step 1" or "Step 2" bags there are rather than just pointing out that you have reached the next point in the process. To be fair I'm not sure if telling you which bags are needed is a good thing as half the fun with Lego is trying to find the accursed brick at the bottom of the box/tray/bowl you're using to store everything in during construction. I'm still not comfortable with the additional feature of each stage telling you what you require (very much like 1980's Technic) but it does avoid the embarrassing moment at stage 84 when it dawns on you that the black flat six you're now holding was an essential part of the structural supports back in stage 12.

Note the landing legs, missiles and ramp - and Vader!

That said, the instructions are clear, logical and should be straight-forward for any builder to follow - even chunky-fingered 33 year old ones. The only bits that get a bit repetitive (understandably) are building the sections for the folding roof panels and the edging at the back of the Falcon. Don't be concerned though as it's all worth it in the end. I'd also note that in comparison to the Imperial Star Destroyer kit (6211) from a few years back, this is much sturdier in construction and won't crumble to pieces when you touch the underside. Additionally the base is supported by four small landing legs which allow you to deploy the boarding ramp so our heroes can escape from Mos Eisley...or the Death Star. As you can possibly just see on the picture to the left, there are also four small "missiles" (red spots) prepped under the hull. They clip in so no worries about them slipping out when the ship is airborne!

While I've compared, possibly harshly, the construction of the Star Destroyer to the Falcon, it's interesting to note that a good portion of the early steps is taken with firming up the underside of the model before you go on to build the interior. Good move, Lego; hope this is a sign of what you will carry through if you ever decide to update the Imperial battleship. 


Note the positions of the internal features
It has to be said that the method in the instructions is irrefutable and at no point was I left wondering where the odd brick was supposed to be placed. There are a few extra bits rolling about in the box at the end but they're additional single brick lights and control sticks mainly in case any decide to do a fateful disappearing act when you're attempting to navigate the odd asteroid field to evade Imperial spacecraft.

Figure-wise we're presented with new editions of Han Solo, Princess Leia and Luke Skywalker. While the Han and Leia figures simply have costume redresses, the Skywalker mini-fig has a reversible head, switching him from farmboy Luke to light-saber training Luke complete with visor and helmet. Alongside them we also have a robed Obi-Wan Kenobi, Chewbacca  and Lord of the Sith, Darth Vader. Only shame - could have done with a C3-PO and an R2-D2 to complete the crew which then beggars the question as to why we really needed Vader in here. 
Just room for two at the controls
"Farmboy" Luke at the gunner controls - turret at the side

Let's take a closer look inside the kit itself. This new edition has a wealth of features and I really loved some of the final finishing touches more than anything on the outer hull. Besides providing budding ship-builders with some extra stickers to mark up their craft, Lego dusted the ship with grills, vents, a radar dish and electric blue rear engine - which all add to a great building experience. I would add here that the engine "hose" piece can be a pain to fit as it only just reaches around the exterior to the two fixing points where it is required to attach to the hull. Don't get frustrated at this time, it will go!

Looking in comparison to the older 4504 model, there are some slight changes and updates. While you don't get the drop ramp feature you gain the removable gun turret (pictured right) with seating for two mini-figs - useful to fend off TIE Fighters from above or below and a nice addition piece that I didn't expect - but that's just one little bit of the whole Millennium Falcon experience. Also this model is slightly longer with a couple of extra brick rows added to the two forward "prongs" and some detail changes on the upper hull sections. Nothing massive and unless you stuck them side by side you probably wouldn't be aware. Technically as this is modelled on Episode IV, it's the "older" version of course! 


Computers, smuggling hold and games area
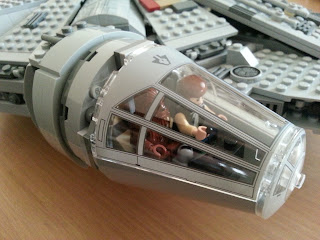
The protruding cockpit will take both Han and Chewbacca although it is a staggered seating arrangement. The canopy is easily removed from two clips to place or remove your mini-figs. It's one of the last sections to build and is an easy clip on piece to the main hull. Moving a little further back the hull sections swing outward (as per the introductory video) and here we have some great interior features. At the front and facing toward the central section is a bank of computers which can be manned by two characters. Beside that are seats for four mini-figs to battle over the holographic chess-style game featured in A New Hope (see picture right) when the ship is escaping from Tattooine. Straight in front of that is the concealed smuggling bay. Directly opposite the boarding hatch this will stow away a single figure however getting them back out is exceptionally fiddly considering there is a section of fixed roof right above it. Turning this ship over to try and free Leia from her hiding place is not an option for anyone of a young age due to the weight of the Falcon - but then smaller fingers might not need to go to that extreme!


Luke in the training bay - note ramp to the right
Moving to the rear of the ship there are beds for two of the crew to rest between shifts right next to the hyperdrive unit. In comparison to the engine in The Empire Strikes Back version of the ship this is a less detailed model and not removable. Not a deal breaker but it would have been nice to have left this feature onboard - as opposed to the removal of the automated ramp in respect of the gun turret it didn't affect another feature. However what we do get directly behind the cockpit is a small area for "Ben" Kenobi to begin training young Skywalker. Complete with droid and blaster-shield helmet he'll make a Jedi of Luke yet! Great to have another A New Hope specific feature within the model. I was very impressed that Lego have gone to the lengths of making it as canon as possible to the original movie.

Rear view - engine "hose" fitted to the two blue blocks

As you can see from the image here there is also a handy toolbox just in case that hyperdrive needs a talking to and there are several other clip points around the ship to hang a blaster when all hands are needed at the controls to repel an Imperial attack. Nicely Chewbacca even gets to have his bowcaster in this set and there are enough tools and lightsabers to go around. There is a bit of "wasted" space just behind the cockpit although what could have been done with it is anyone's guess (check the instruction diagram earlier) as it's not needed for access to the flight controls.


Up above - hull details are just enough
This is one of the three largest kits that I now own alongside the Imperial Star Destroyer and the Republic Cruiser (7665) from The Phantom Menace. It's definitely the most impressive kit I've built and nowhere near as fiddly as the other two were at stages of their construction. It's not an essential addendum but if you want to drop it back in the box it will easily fit for storage with the legs and upper and lower gun turrets removed. Lego have done a great job here with the model, providing excellent detail, some quirky tweaks to the included mini-figs and an excellent finish to what is undoubtedly one of their trademark Star Wars kits. It is large and can be heavy for children to move so just be aware of that when you purchase however it is exceptional and a worthy addition to any collection. The only thing that might put you off is the price. 

Due to the licencing (I suspect) the whole of the Star Wars range has always seemed a bit higher in cost than any other Lego products so I would expect you to pay over £100 for the Millennium Falcon from Amazon and that's a good price. Overall a sound recommendation to buy but it could damage your wallet a little more than you might have planned!

Thursday 31 January 2013

Calling International Rescue: The Haynes Thunderbirds Agents' Technical Manual

Back in the early 90's, the UK was swept up in a second wave of Thunderbirds mania which saw the UK children's programme Blue Peter overwhelmed for its plans to build a home-made Tracy Island and a branded comic on newsagent shelves.

While the comic contained the usual array of picture stories it also included cutaways of the Thunderbirds and associated vehicles. They were great - but Haynes' latest addition to their sci-fi/fantasy range raises the bar to another level.

Introduced by family patriarch Jeff Tracy, this sets its launch bay out to be the definitive technical guide to the world of the Thunderbirds TV series and the work of the late, great Gerry Anderson. The result is impressive to say the least.

An initial section sets the scene nicely by introducing us to the world of 2065, namedropping several of the vehicles and incidents that would prove extremely memorable over the course of the series. Not to give too much away but there's mention of the Fireflash, the Sun Probe and the infamous moving of the Empire State Building within a matter of pages which builds a wonderful vision of a world of amazing technological advance which would have been 100 years distant when Gerry Anderson developed his landmark programme.

Courtesy of Haynes Publishing
Once we're well and truly ensconced in 2065, author Sam Denham provides a wonderful section detailing the conception of International Rescue and build up to their first mission. We discover what made Jeff pick the location, learn how Brains came on board to develop the striking craft and just what made Lady Penelope stand out as the perfect secret agent. Now I've not been a massive fan of Thunderbirds so for the average fan/viewer so this background "fill in" is most welcoming although many life-long fans may already have quite a good understanding of this information. It's nicely set but once you're into the main bulk of the book it stands out because it's the only section with a true narrative style. One image that does stand out in this early section is Thunderbird 2 under construction which is a great addition and perhaps it would have been nice to see more of these instead of stills from the series.
Courtesy of Haynes Publishing

From page 16 onwards though we begin a slow and fairly seamless transition into the more technical aspect of the manual with an overview of the Tracy Island retreat and some of its key interiors. The diagrams here are particularly detailed - much more so than in the aforementioned Thunderbirds comic from the 1990's. Graham Bleathman has done an incredible job and it just gets better. The remainder of the section covers the launch bays of the four Earth-based craft and the classic ways in which the pilots were delivered to their vehicles as they prepared for action. Bleathman's illustrations nicely cross-reference each other here as launch system chutes and monorail tracks criss-cross beneath the Tracy Villa. Somehow it brings everything together, making it ever more realistic that everything is packed into such a tight area. Besides that, we have reference to emergency escape routes, systems to remove exhaust fumes as well as the location of fire suppression systems and launch control rooms.  How many still camera shots these guys poured over to get this kind of intricacy I can only imagine. Some sections are "not seen before" such as the outer bays for the loading of TB2's pods and the extra areas of Brains' laboratory; these additions fill in some of the blanks as to how things "really" worked in this environment. There's even the nearby emergency launch base of Mateo Island to explore - just there in case things go wrong at HQ.


There's no narrative section with each picture, only a brief introduction to note what you're looking at but your time with this book will be more than accounted for linking the expansive key accompanying each illustration to its relevant location. Following the dissection of the island base the remainder of the manual is devoted to vehicles - initially Thunderbirds 1 through 5, each with their own sections, then Secondary Vehicles covering many carried by Thunderbird 2 to the danger zone during the series. Notably here we also have some lesser-remembered craft including the Ladybird jet and the BR2 Lightning 505 car. 
Courtesy of Haynes Publishing

There are two distinct angles within the pages which cover the vehicles. Bordered with (brief) pilot profiles, we get, once more, very detailed and cross-referenced diagrams of each one from numerous angles, covering every aspect of its inards in black and white (see the Mole example; right)but what really fascinated me and made this book that little bit special is that Graham Bleathman has retained a 60's feel to Gerry Anderson's creations. Alongside those cutaway schematics we have "period" drawings (as Thunderbirds 3,4 and 5 shown here). These are a great addition to the book as the authors could have chosen to take a more modern view on the writing and illustrations (not in the frame of the notorious movie I might add) and CGI'd everything. Giving it the 60's pastel-finish sets them perfectly besides the colour stills from the series which provide addition memory refreshers of how the techie stuff we're reading about fitted into the series.  Interestingly they have also included pictures of the control consoles of each craft which is likely to interest even the most die-hard fans as the reproductions are excellent.


Courtesy of Haynes Publishing
The secondary vehicles are a real "oh yes I remember that one" moment as several only made one or two appearances.  While it would be wrong to omit the instantly recognisable Mole and the seemingly indestructible Firefly we also have the elevator cars, the transmitter truck and the Domo among others, all loving recreated and split apart for our viewing pleasure. I loved this but there could have been much more narrative around the craft, where we saw them (as a reminder if nothing else) and a few more titbits of information. The diagrams are still superb but it feels that there might have been a bit of substance overlooked here and an opportunity missed. 

The third section of this Haynes production focuses on Global Operative (read here Lady Penelope) so you can expect both FAB 1 and FAB 2 to receive 99% of the attention (and rightly so!). Once you've moved past this, which is very much in keeping with the rest of the manual, the final five pages are devoted to "Mission Logs". Essentially this is an episode guide, splitting each segment into an incident.  Now, the manual as a whole is superb and don't get me wrong, there's a wealth of information that will keep you reading for hours - and then referring back for ages beyond that, but wouldn't it have been wiser to include a proper episode guide here?  In production/viewing order rather than alphabetical?  In fact, this could have been expanded a little more to make a nice appendix to put everything into context.

My second niggle with this manual is that fact that it limits itself through its own title. Marking this as the International Rescue Thunderbirds Agents' Technical Manual cuts out what could have been an excellent fourth section. Perhaps it's an option for an additional volume in the future (Sam and Graham I hope you're listening!) so we could see the workings of the Sidewinder, the Fireflash, the Pacific Atlantic Monorail, the Crablogger or the classic Sun Probe? The Hood could also get a more detailed piece too as he seems a bit shortchanged here (one page and one picture on the inside of the back cover). I'd certainly part with some cash to read it and no doubt other fans of the series would too. Lastly - and this is down to the construction of the book rather than the authors - some of the reference numbers lie right in the spine and can be hard to read.  A shame but probably unavoidable given the nature of the beast in print.

Overall this is a great inside guide to the workings of International Rescue and their iconic Thunderbird craft. It's not a storybook and perhaps wouldn't suit children because of the intricate content. Gripes aside it is very well presented and a credit to the authors particularly in regards to the level of detail included in every single drawing. The length of time I poured over the images was impressive and I keep going back and finding things I hadn't seen the first time or had completely taken in. I have niggled a bit but the true highlights were the craft themselves, presented in their original glory and given equal standing with some great stills to match. I was always a fan of the "yellow submarine" (intentional?), Thunderbird 4 and the drawings were not a disappointment here. If you've heard about Gerry Anderson recently and want to find out more about some of the things he did then this would make a great introduction to the late puppeteer's work. Older and "die-hard" fans will just love that there are still people out there who love this material enough to produce such an enthralling book.  Can we look forward to Captain Scarlet or Stingray being covered in the future?  I do hope so. The SPV is crying out for a good cutaway!

Oh yes, one more thing - the green cover - nice touch!

The International Rescue Thunderbirds Agents' Technical Manual is available NOW from Haynes website ISBN 978 0 85733 117 5 priced £14.99.